MFO Crossbow Fiber Optic Sight for Barnett CarbonLite Crossbows
Designed for the serious crossbow hunter the "MFO" fiber optic crossbow sight for your Barnett crossbow is built to take abuse and still keep its accuracy just like the entire Barnett CarbonLite line of crossbows. The “MFO” sight also comes available to be equipped with the “Tagged-Out”™ ranging system that will allow the shooter to know the distance all while aiming at the same time. This is truly the world’s best and only multi fiber optic crossbow sight available today!
MFO Sight Mounting
Using the button head screws and nut’s provided, mount the MFO sight to the front end of your crossbow by inserting screws from the top through the sight into the two slots on either side of the rail found at the front head of your crossbow. Now using a 3/8 socket, hold nuts securely in place and tighten down nut and screw to mount the MFO firmly in place. Note: Be careful not to over tighten and be sure to have the MFO centered on the rail. Don’t be considered if off slightly the peep will take care of this when sighting in!!
Peep Mounting
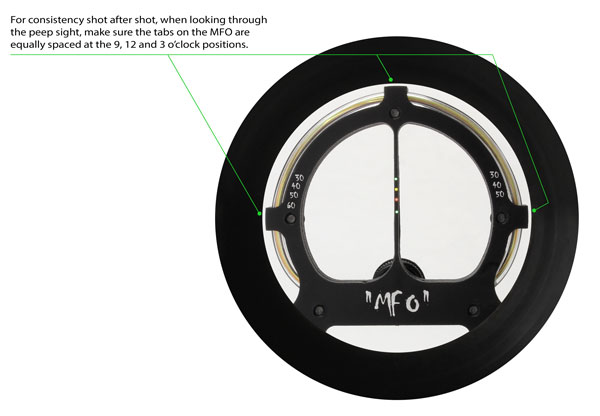
Simply slide the peep onto the scope rail from the back end of the Barnett crossbow. Before tightening down, shoulder the bow for your comfort level for shooting. Viewing the Sight through the peep, you should obtain a circle to circle balance between the peep and sight at the 9, noon and 3 o'clock positions. Viewing the image below you can see the outer circular ring is the peep sight and its balanced using the fiber wrap tab portion of the sight at 9 o’clock on the left, noon at the top, and 3 o’clock on the right. This is important! It’s what creates the consistant accuracy of the MFO. Once you have accomplished this, tighten down the screw into lower slot location of the scope rail.
Sighting in Your MFO
Simply by placing your target at a starting distance of 10 yards and by using your first pin, place your shot one inch high at the noon position of the bull’s-eye. Sight adjustment for the MFO is made by using the elevation and windage portion of the peep. Moving the peep left, moves shot placement left, right moves it right. By moving the peep wedge up, moves shot placement up and by moving it down, moves shot placement down. See note #1 below for the 375 & 400 fps Models! Now set your target at 30 yards, for the 350 & 365 fps models and sight in again the first pin to hit correct shot placement. Once this is accomplished the following pins will match distance of 40 yards with 2nd pin 50 yards with 3rd pin and 60 yards with your 4th pin for the 350 model.
Note #1 For the 375 & 400 fps Models! Repeat the above process but start first pin at 40 yards instead of 30 yards as the faster models pins are set for 40, 50, 60, and 70 yards.
Note#2: We find by using the top of the pins to do the sighting in sometimes helps shooters that get a star bright affect caused by far sightedness. This method can also allow you as a shooter to view the impact location of what you are aiming at.
Now You're Ready
(If Equipped) start ranging and shooting!! Depending on what species “Tagged-Out”™ you have mounted on your “MFO" sight; deer, elk or Deer/Elk Combo, simply use the size given to you by Bad River Outdoors. For Deer, use a 16" target, and for Elk a 25". Now all you do is using the long horizontal bar at the bottom of your rangefinder, place this across the belly line of the animal and then read where it's back lines up in the upper brackets to determine the distance. After reading the distance simply go to the pin that represents that given distance and shoot. When holding the Belly Bar in correct position at a moving animal, view the back location to obtain a continence reading of distance. We recommend that when practicing always range and shoot at the same time. Upon doing this you will notice that the ranging brackets and the pins represent each other. Now it becomes so easy to know the proper pin EVEYTIME!
Example for Deer: If the deer is located in the 1st ranging bracket of your “Tagged-Out”™ rangefinder you simply use the 1st pin, ranges in the 2nd bracket, use 2nd pin, ranges in the 3rd bracket use 3rd pin, it’s that simple.
Example for Elk: If the Elk is located in the 1st ranging bracket of your “Tagged-Out”™ rangefinder you simply use the first pin, ranges in the 2nd bracket, use 2nd pin, ranges in the 3rd bracket use 3rd pin, ranges in the 4th bracket, use 4th pin, it’s that simple.
So now just always remember it’s this simple: 1st Bracket 1st pin, 2nd bracket 2nd pin, 3rd bracket 3 pin, 4th bracket 4th pin.